Some businesses live and die by a handful of dates each year. E-commerce stores brace for Black Friday, Cyber Monday, seasonal sales, and product launches. Sports media and betting platforms hit their yearly peaks during the World Cup, the Super Bowl, the Champions League final. News sites spike on elections and breaking events. Ticketing platforms get crushed the moment a popular act announces a tour.
These traffic events have one thing in common: they're predictable. You know they're coming, you know roughly when, and you know they'll push your infrastructure past whatever's comfortable. The only real question is whether you'll be ready or whether your site will crawl, throw 502s, or fall over entirely while your competitors take the customers.
Whatever event your business depends on, this guide gives you a realistic two-week playbook to scale your infrastructure before it matters.
You can't fix what you don't measure. Before you buy bigger servers or add load balancers, you need a baseline.
Spin up your monitoring or open a terminal and pull live metrics during a normal traffic hour:
htopWatch CPU, memory, swap, and load average. If load is already near or above your number of cores during normal traffic, you have no headroom left for an event spike.
iostat -x 2This shows disk I/O. If %util is high (above 70%) during normal hours, your storage is the bottleneck. SSD/NVMe matters here. If you're on traditional spinning disks, that's your first upgrade.
ss -sShows your current network connections. If you're maxing out simultaneous connections, your kernel networking limits may need tuning (net.core.somaxconn, net.ipv4.tcp_max_syn_backlog).
For your database, run the equivalent. On MySQL/MariaDB:
SHOW PROCESSLIST;
SHOW STATUS LIKE 'Threads%';
SHOW STATUS LIKE 'Connections';
On PostgreSQL:
SELECT count(*) FROM pg_stat_activity;The goal is simple: know where you stand today, in absolute numbers. "Things feel slow sometimes" isn't data. "Database CPU sits at 60% during peak hours and we serve 800 requests per second" is data.
Before scaling out, scale up what you already have. A few changes can multiply your capacity without touching your server count.
Enable caching aggressively. If you run WordPress, Magento, Prestashop, or any CMS, your number-one quick win is full-page caching. Plugins like Redis Object Cache, W3 Total Cache, or LiteSpeed Cache can drop your server load by 80% or more. A cached page is served from RAM and takes about 1 ms. An uncached page hits PHP and the database and takes 200 ms or more.
Turn on opcache for PHP. It's bundled with PHP 7+ and disabled by default in some configs. Edit /etc/php/8.x/fpm/php.ini:
opcache.enable=1
opcache.memory_consumption=256
opcache.max_accelerated_files=10000
opcache.validate_timestamps=0
Restart PHP-FPM. Your application's PHP execution time typically drops by 30 to 60%.
Compress responses. In Nginx:
gzip on;
gzip_comp_level 6;
gzip_types text/plain text/css application/json application/javascript text/xml application/xml application/xml+rss text/javascript;
Or use Brotli if your build supports it. Compressed responses cut bandwidth usage by 60 to 80% on text content, which means faster delivery and less network saturation.
Put a CDN in front of static assets. Images, CSS, JS, fonts, and videos should never hit your origin server during a traffic event. Offload them to a CDN. Cloudflare's free tier covers most use cases.
These four changes alone often add up to 5x to 10x more capacity on the same hardware. Do them first, before you spend money on bigger machines.
There are two ways to handle more load: bigger servers (vertical scaling) or more servers (horizontal scaling). Vertical is simpler and faster to set up.
If you're on a Cloud server today and traffic is climbing, the first move is to grow into a VPS with more RAM and CPU. If you're already on VPS and your single-machine setup is maxed, the next jump is to a dedicated server with bare-metal CPU performance, no hypervisor overhead, and dedicated NVMe storage.
Vertical scaling works until it doesn't. A single server can only get so big, and at some point you need to spread the load.
Signs you've outgrown vertical scaling:
When you hit those, it's time to scale out.
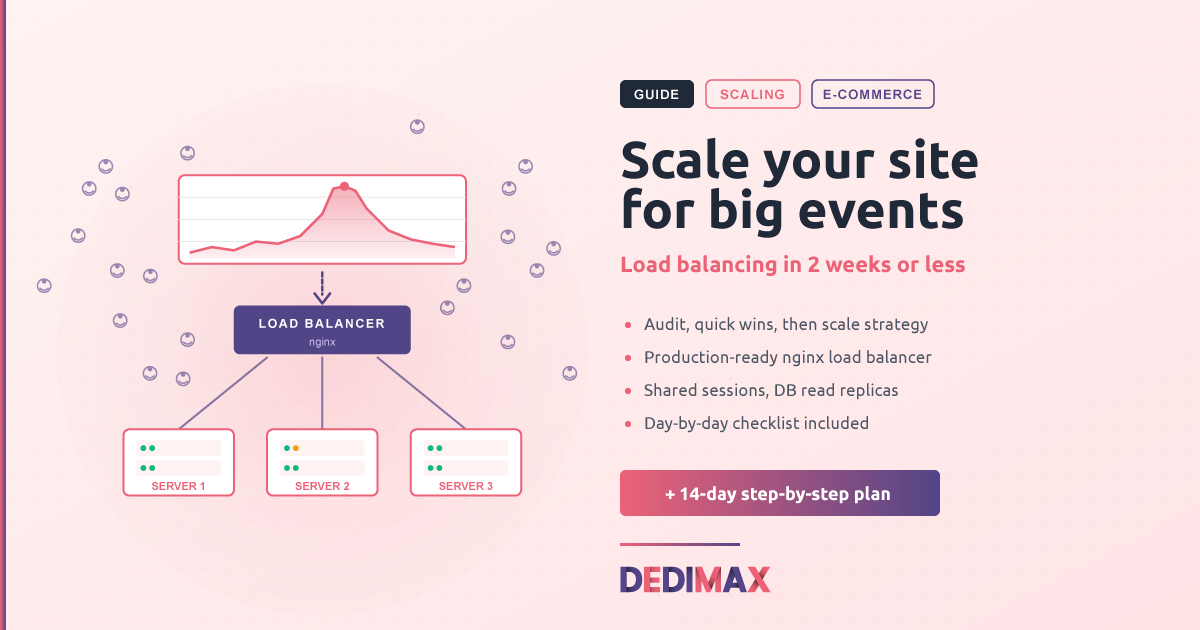
Horizontal scaling means putting multiple application servers behind a single entry point. That entry point is a load balancer. Nginx is the most standard choice. It's free, fast, well-documented, and you probably already know it.
The basic setup: one server acts as the load balancer. It receives all incoming traffic and forwards each request to one of your application servers (the "backends"). If a backend goes down, the load balancer stops sending traffic to it automatically.
Start with two backends. SSH into your load balancer machine and install Nginx:
sudo apt update
sudo apt install nginx -y
Edit /etc/nginx/sites-available/loadbalancer:
upstream backend_servers {
    least_conn;
    server 10.0.0.11:80 max_fails=3 fail_timeout=30s;
    server 10.0.0.12:80 max_fails=3 fail_timeout=30s;
    keepalive 32;
}

server {
    listen 80;
    server_name yourdomain.com www.yourdomain.com;

    location / {
        proxy_pass http://backend_servers;
        proxy_set_header Host $host;
        proxy_set_header X-Real-IP $remote_addr;
        proxy_set_header X-Forwarded-For $proxy_add_x_forwarded_for;
        proxy_set_header X-Forwarded-Proto $scheme;

        proxy_http_version 1.1;
        proxy_set_header Connection "";

        proxy_connect_timeout 5s;
        proxy_send_timeout 60s;
        proxy_read_timeout 60s;
    }

    location /health {
        access_log off;
        return 200 "OK\n";
        add_header Content-Type text/plain;
    }
}
Replace 10.0.0.11 and 10.0.0.12 with the private IPs of your backend servers. Enable the config:
sudo ln -s /etc/nginx/sites-available/loadbalancer /etc/nginx/sites-enabled/
sudo nginx -t
sudo systemctl reload nginx
A few things to know about this config:
least_conn sends each new request to the backend with the fewest active connections. For most workloads this performs better than the default round-robin.max_fails=3 fail_timeout=30s means if a backend fails 3 health checks in 30 seconds, it gets pulled out of rotation automatically.keepalive 32 reuses connections between Nginx and backends, which cuts down on TCP handshake overhead./health endpoint lets your monitoring (or another load balancer in front) verify the LB itself is alive.For HTTPS, add Let's Encrypt:
sudo apt install certbot python3-certbot-nginx -y
sudo certbot --nginx -d yourdomain.com -d www.yourdomain.com
SSL termination happens on the load balancer. Your backends serve HTTP only, on the private network. This is faster (one SSL handshake instead of N) and easier to maintain.
Multiple application servers create a new problem: where does session data live? If user A's first request hits server 1 and their second hits server 2, server 2 doesn't know who they are. Their cart is empty. Their login is gone. They leave.
You have two options. Pick one.
Option A, sticky sessions. Configure the load balancer to always send a given user's requests to the same backend. In Nginx, change least_conn to ip_hash:
upstream backend_servers {
    ip_hash;
    server 10.0.0.11:80;
    server 10.0.0.12:80;
}
Simple, but if that backend goes down, that user loses their session. Acceptable for some sites, not for e-commerce.
Option B, shared session store. Put sessions in Redis or Memcached, on a separate server (or one of your existing servers). All backends read and write to the same session store. Any backend can serve any request.
For PHP, this means editing php.ini:
session.save_handler = redis
session.save_path = "tcp://10.0.0.20:6379"
For Node.js, Django, Rails, and most modern frameworks, similar one-line config changes. This is the right answer for anything serious.
The same principle applies to file uploads. If your app saves uploads to local disk, those uploads exist on only one backend. Move them to object storage (MinIO, S3-compatible) or a shared NFS volume.
Web servers are easy to scale because they're stateless. Databases are hard because they're not. This is where most "we added more servers and it still crashed" stories come from.
Read replicas. Most application traffic is reads (product pages, search, listings). Set up one or more read replicas of your primary database. Configure your application to route reads to the replicas and writes to the primary. PostgreSQL has built-in streaming replication. MySQL/MariaDB has built-in async replication. Both are documented in their official docs and can be set up in an afternoon.
Connection pooling. Most databases choke when too many connections open at once. PgBouncer (for PostgreSQL) and ProxySQL (for MySQL) sit between your application and database, multiplexing connections. This alone can 5x your database's effective capacity.
Query optimization. Run EXPLAIN on your slowest queries. Add indexes where they're missing. A single missing index on a 10 million row table can take a query from 5 ms to 5 seconds.
Cache the read-heavy stuff. If a query result rarely changes (product details, category lists, settings), cache it in Redis with a TTL. The database never even sees those reads.
If your database is the bottleneck and read replicas + caching aren't enough, you need a more powerful database server. This is one of the strongest cases for a dedicated server: databases love direct hardware access, fast NVMe storage, and lots of RAM for buffer pools.
Don't find out your scaling works (or doesn't) when real traffic hits. Stress test it first.
Tools like wrk, ab (Apache Bench), and k6 simulate concurrent users. The goal isn't to break your site, it's to find where it breaks so you can fix that part. Start with a realistic load (your current traffic × 3 or × 5) and ramp up from there.
A basic ab test:
ab -n 10000 -c 100 https://yourdomain.com/This sends 10,000 requests with 100 concurrent connections. Watch your servers during the test. Where does it slow down first? CPU? Memory? Database?
For monitoring on the day, Uptime Kuma (which we've covered before) is the simplest option. Set up checks on your main pages, your API endpoints, your database port, and your SSL certificate. Alert to Slack, Discord, or your phone the moment anything goes wrong.
Have a rollback plan. If you push a last-minute config change at 3 AM the night before and traffic starts dropping at 8 AM, you need to revert fast. Snapshot your servers before any change. Document the exact commands to roll back.
This guide covered Nginx because it's the most common entry point and works for nearly every setup. As your traffic grows, you might evaluate alternatives.
HAProxy is purpose-built as a load balancer (Nginx does it well but isn't dedicated to that task). HAProxy gives you finer-grained control over health checks, more advanced load balancing algorithms, and slightly better raw performance at very high request rates. If you're handling tens of thousands of requests per second, HAProxy is worth a look.
Traefik is a more modern option, with automatic service discovery if you're running Docker or Kubernetes. It generates routing config from container labels, which is great in dynamic environments.
Cloud-managed load balancers exist with several providers. They handle the infrastructure for you and scale automatically. The trade-off is less control and recurring fees.
For most businesses preparing for a high-traffic event in two weeks, stick with Nginx. It's well-known, well-documented, and you can find help fast if something goes wrong at 2 AM.
If you're starting from a single-server setup and want to be ready in two weeks, here's the order.
Week 1
Week 2
ab or k6, fix what breaksTwo weeks is tight but realistic if you stay focused. The biggest mistake is trying to do everything at once. Take it one step at a time, verify each step works, and you'll arrive at event day with infrastructure that handles whatever the day throws at it.
Whatever your business runs on, the worst-case scenario is your site being down when it matters most. The good news is that the techniques above are well-understood and battle-tested. None of this is exotic. It just takes a couple of weeks of focused work.
Take control of your dedicated server (settings, data ...) without any limits in apps usage.
What are you waiting for ?
We’re waiting for you on our blog. New guides and tutorials published regularly (sysadmin, gaming, devops...) !
Let me check